Overview
This documentation is DEPRECATED.
Some descriptions might be invalid.
Introduction
Technical concepts
Technically Universal Login utilizes four major concepts:
- Personal multi-sig wallet - a smart contract used to store personal funds. A user gets his wallet created in a barely noticeable manner. The user then gets engaged incrementally to add authorization factors and recovery options.
- Meta-transactions - that gives user ability to interact with the smart contract from multiple devices easily, without a need to store ether on each of those devices. Meta-transactions enable payments for execution with tokens.
- ENS names - naming your wallet with easy-to-remember human-readable name
- Universal login - a wallet name can be used to log in to dapps, web, and native applications
Components
Universal Login has four components. All components are stored in one monorepo available here. Components are listed below:
- Contracts - smart contracts used by Universal Login, along with some helper functions
- Relayer - HTTP REST server that relays meta-transactions to Universal Login smart contracts
- SDK - javascript API, a thin communication layer that interacts with the Universal Login ecosystem, via both relayer and Ethereum node.
- React - typescript library, that contains Universal Login main components to use in react applications.
Dependencies
The diagram below shows dependencies between components.
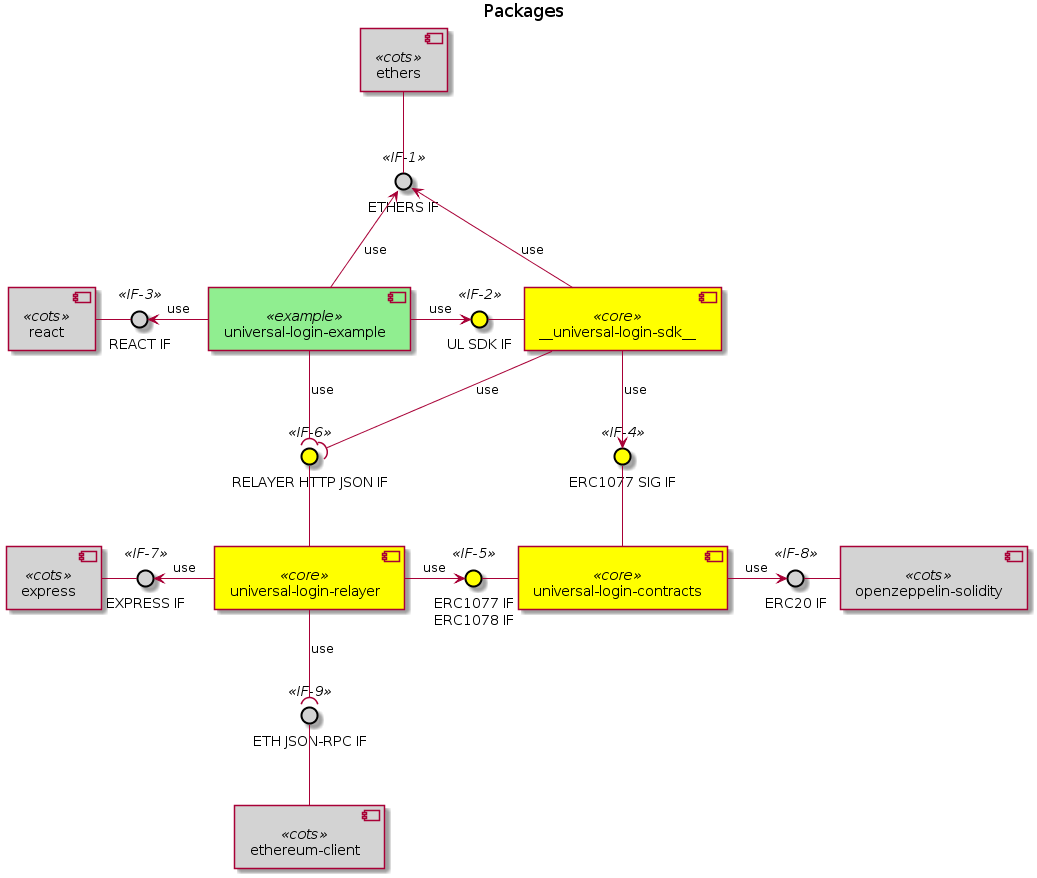
The external interfaces present in the Universal Login system are identified by the lollipop use symbol:
- <<IF-6>> RELAYER HTTP JSON IF
- this interface defines an off-chain remote API for ERC #1077 and #1078
- <<IF-9>> ETH JSON-RPC IF
- this interface is the Ethereum JSON-RPC API for the on-chain execution
The internal interfaces defined within the Universal Login system are identified by the arrow use symbol. The main ones are:
- <<IF-2>> UL SDK IF
- the JS applications using Universal Login shall be based on this library interface to conveniently attach to the Relayer subsystem and route their meta transactions
- <<IF-4>> ERC1077 SIG IF
- this interface is a message hash and signature JS facility API for ERC #1077
- <<IF-5>> ERC1077 IF / ERC1078 IF
- this interface is made up of ERC #1077 and #1078 smart contracts ABI
Main concepts
Deployment
Deployment is designed in a way that makes the user pay for himself. To do that, we use counterfactual deployment (create2 function to deploy contract).
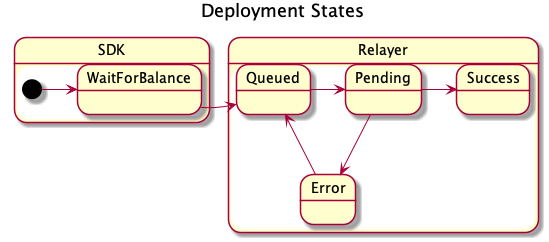
The process looks as follows:
- computing contract address - The SDK computes a deterministic contract address. A contract address is unique and is obtained from the user’s public key and a factory contract address connected to a particular relayer.
- waiting for balance - The user sends funds to this address. He can transfer ether on his own or use an on-ramp provider. The SDK waits for the future contract address balance to change. If the SDK discovers that required funds appear at this address, it sends a deploy request to the relayer.
- deploy - The relayer deploys the contract and gets a refund from it immediately.
- refund - During deployment the contract will refund the cost of the transaction to the relayer address.
Deployment in-depth
An SDK creates deployment. The deployment contains the following parameters:

- ensName - ENS name chosen by a user. It is the only parameter provided by the user.
- publicKey - the public key of a newly generated key pair on the user’s device.
- ensAddress - the address of ENS contract. It is required to properly register the ENS name.
- resolverAddress - the address of Resolver contract. It is required to properly register the ENS name.
- registrarAddress - the address of Registrar contract. It is required to properly register the ENS name.
- gasPrice - gas price used in the refund process.
- signature - the signature of all of the arguments above. The signature ensures parameters come from the owner of the private key (paired to the public key). In particular, it prevents against malicious ENS name registration and gas price replacement.
ENS name collision
Deployment contains ENS name so it could fail (for example when ENS name is taken). That’s why we require success on register ENS name. If it fails, the contract won’t be deployed, so the user can choose ENS name once again and register it on the same contract address.
Deployment lifecycle
It starts when the user generates a contract address assigned to him. The first half of deployment is waiting for the user to send funds to the computed contract address.
Meta-transactions
Message (also known as meta-transaction or signed messages) is a way to trigger ethereum transaction from an application or device that does not possess any ether. The message states the intention of the user. It requests a wallet contract to execute a transaction. (eg: funds transfer, an external function call or an internal function call - i.e. an operation in the wallet contract itself). An application sends a message signed with one or more of the keys whitelisted in the contract to the relayer server. The relayer than wraps the message into an ethereum transaction. The message is then processed by the contract as a function call. The relayer wallet is paying for transaction gas. The wallet contract refunds the cost of execution back to the relayer in ether or ERC20 token. The message contains the following parameters:
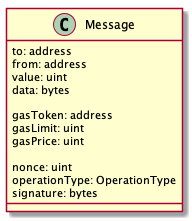
- to - the recipient of the message call
- from - the address of contract that executes the message
- value - number of Wei to send
- data - data for the transaction (i.e. an encoded function call)
- gasToken - address of token used for refund
- gasLimit - maximum gas to use in for a specific transaction
- gasPrice - gas price to use in the refund process
- nonce - an internal nonce of the transaction relative to the contract wallet
- operationType - the type of execution (call, delegatecall, create)
- signature - the signature of all of the arguments above, which ensures parameters come from the owner of the allowed public-private key pair
Message lifecycle
A message starts its journey when it is created and signed by a user (i.e. an application or an SDK) and then sent to a relayer. In the relayer it goes through the following states:
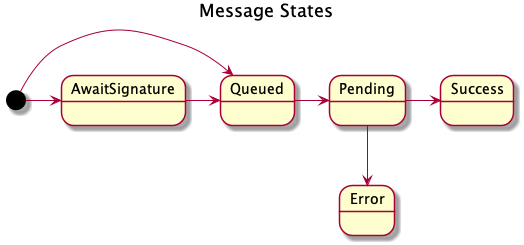
- await signature
optional- The relayer waits to collect all the required signatures if the message requires more than one. - queued - The message is queued to be sent.
- pending - The message is propagated to the network and waits to be mined. In a pending state, the message has a transaction hash.
- sucess / error - A mined transaction is a success or an error. In a success state, the content of the message status is not changed. In an error state, the message has an error message.
New device connection
One of the key activities is connecting a newly created public key to the existing smart contract wallet. The new public key is created on a new device or application that never interacted with the smart contract wallet before. See below.
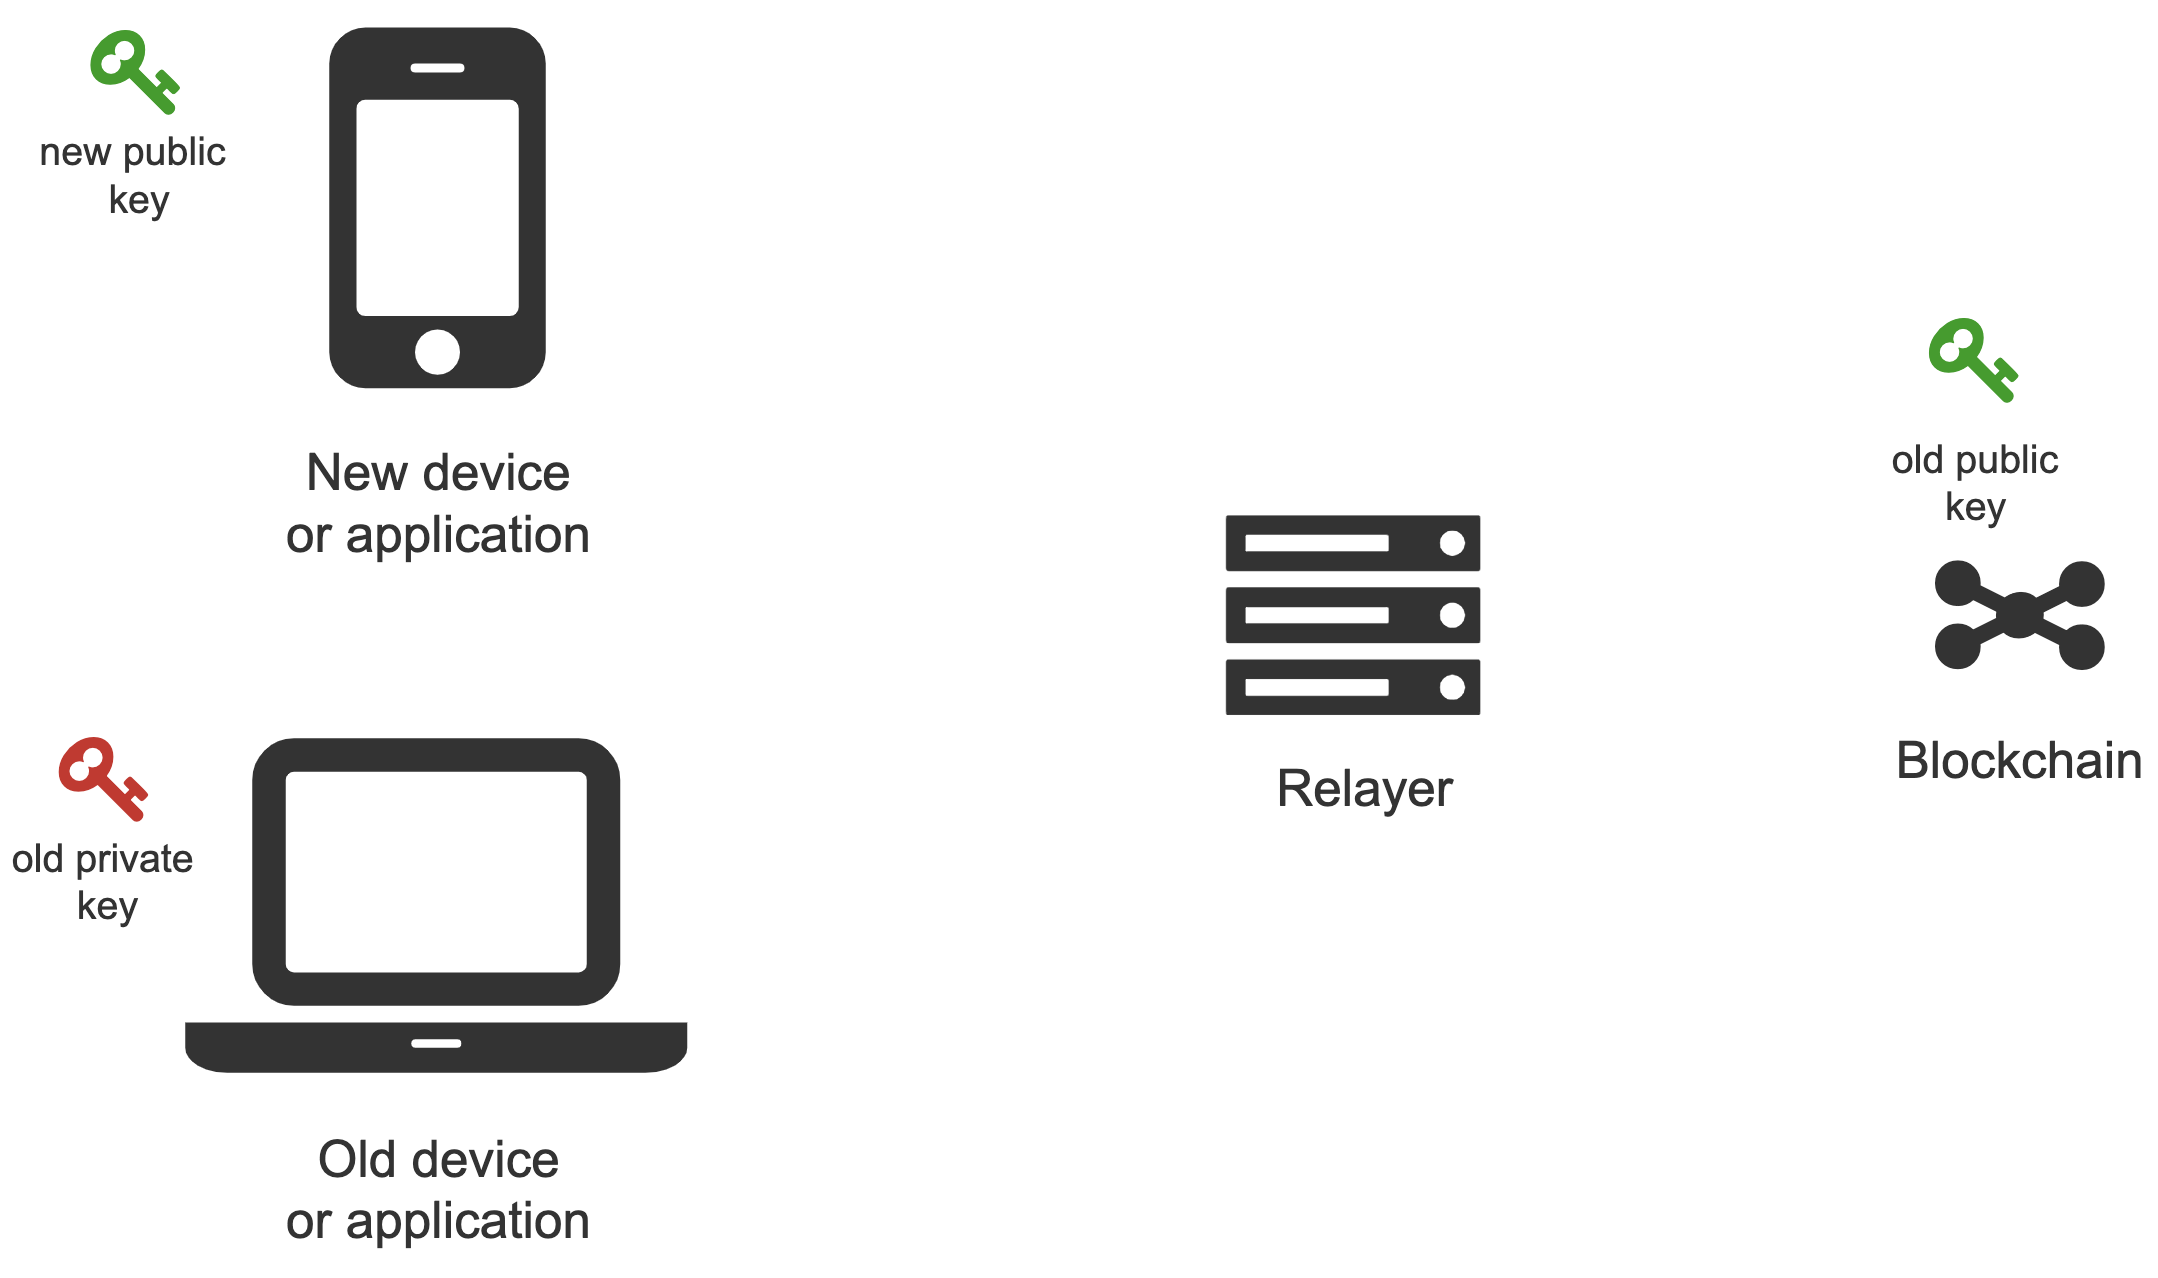
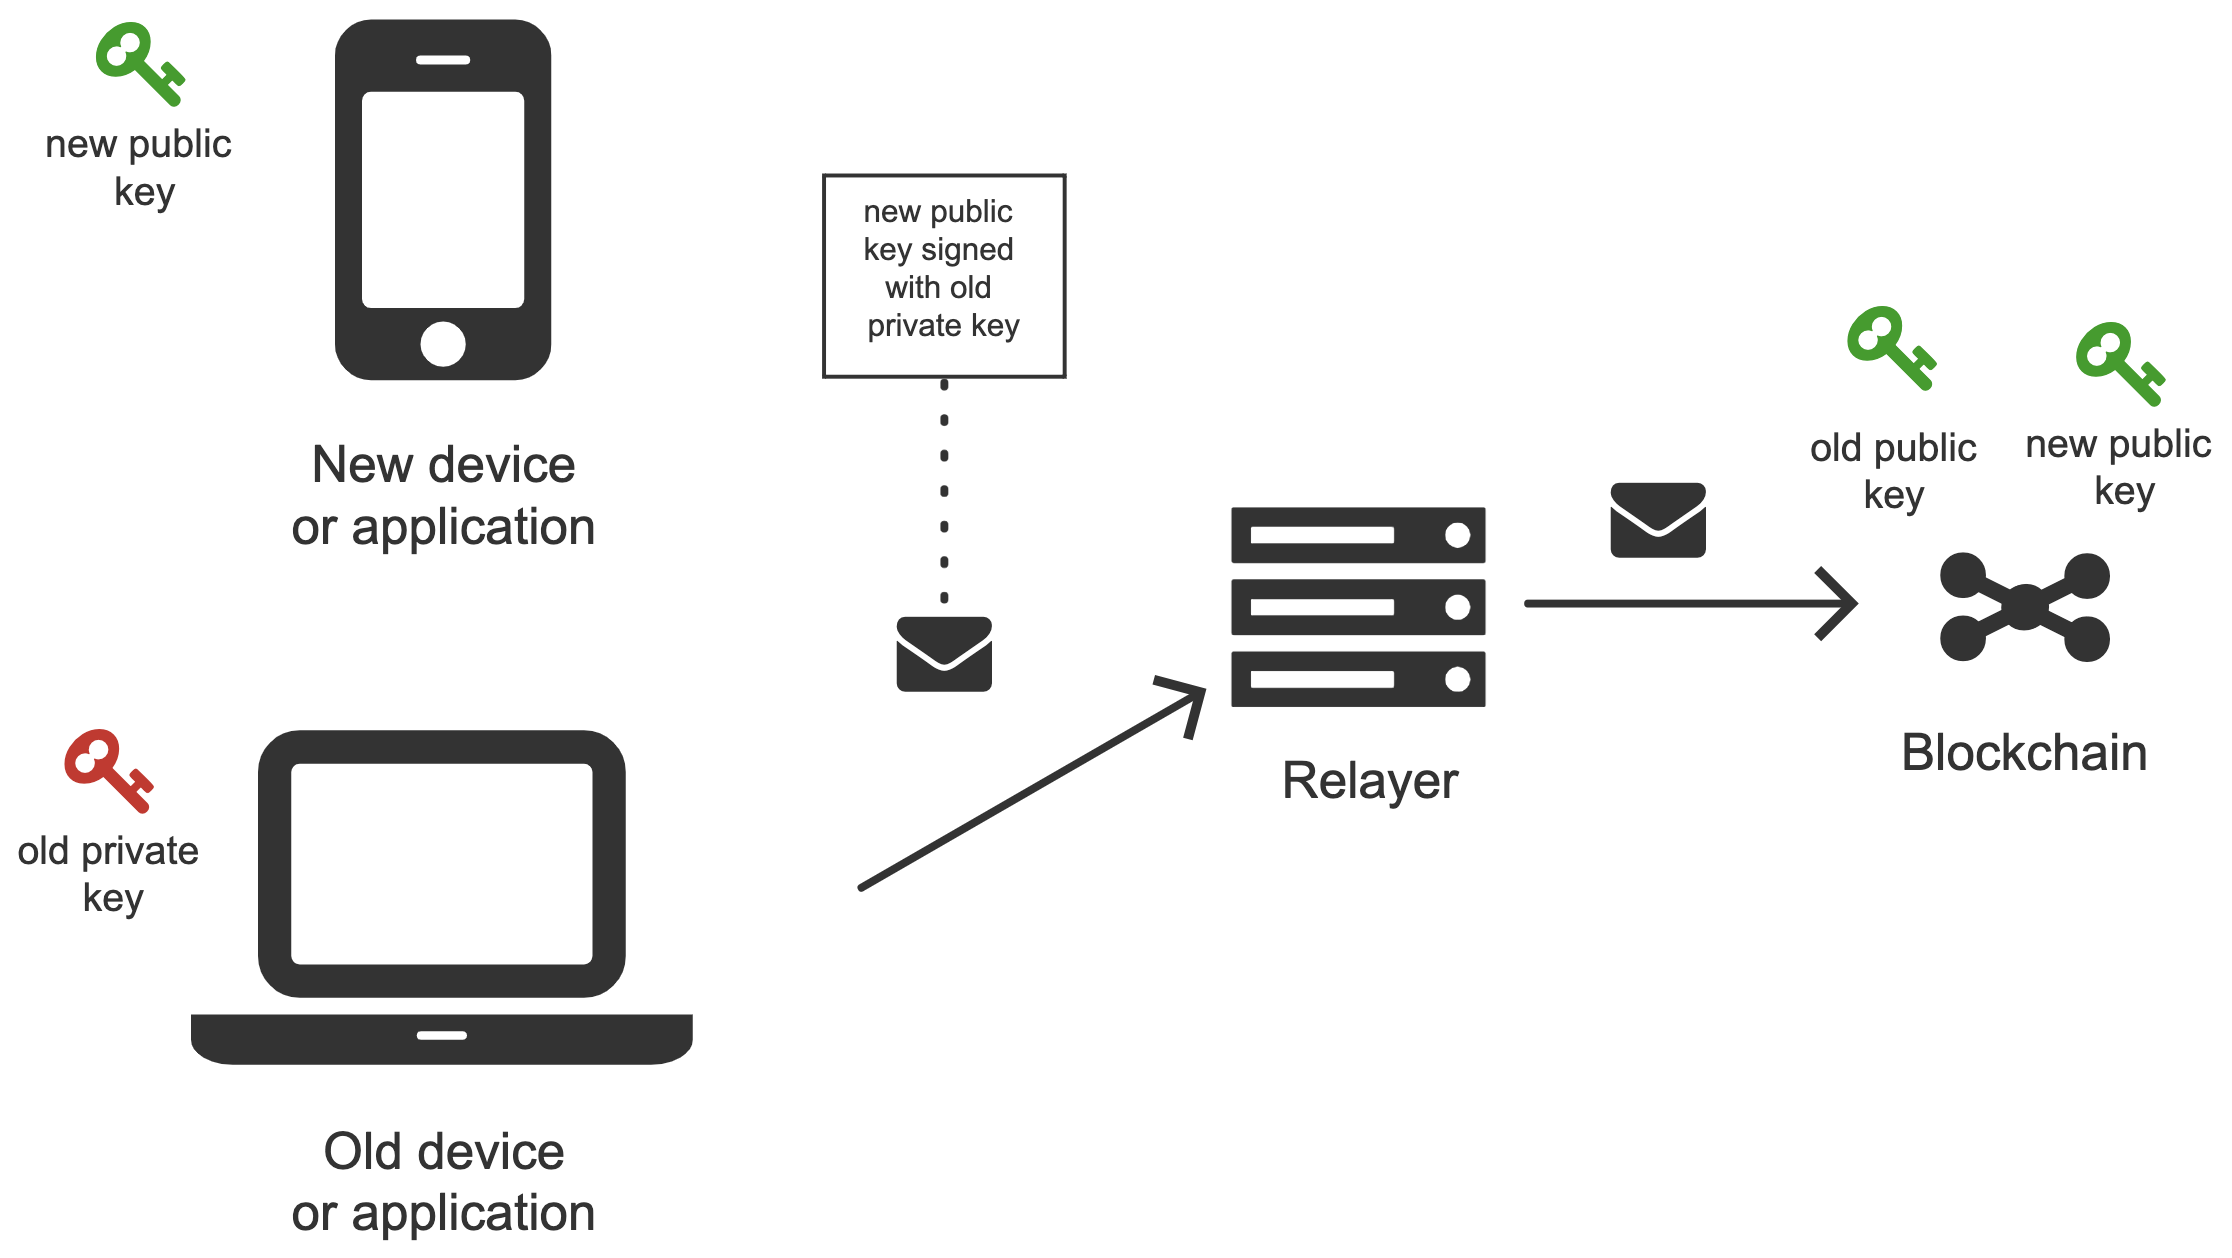
The new public key is added using a meta-transaction. The meta-transaction needs to be signed with the private key from a device that is already authorized in the wallet smart contract. After signing, the meta-transaction is sent to the relayer, which propagates it to the blockchain. The picture below shows this process.
There are four key actors in the process:
- Old device or an application that is already authorized. Authorized means that there exists a public-private key pair, where the private key is kept on the device and the public key is stored in the wallet smart contract on the blockchain.
- New device (or a new application) that we want to authorize to use the wallet smart contract. To do that we need to generate a new public-private key pair and add the new public key to the wallet contract as a management or action key. The public key is added by creating a meta-transaction signed by the old device (old private key) and sending it to the relayer.
- Relayer - relays meta-transaction sent from an old device to the blockchain
- Smart Contract Wallet - a smart contract that stores keys and executes meta-transactions.
Possible attacks
The problem might seem pretty straightforward, but there are some complexities to consider. In particular, we should avoid introducing the possibility of the following attacks:
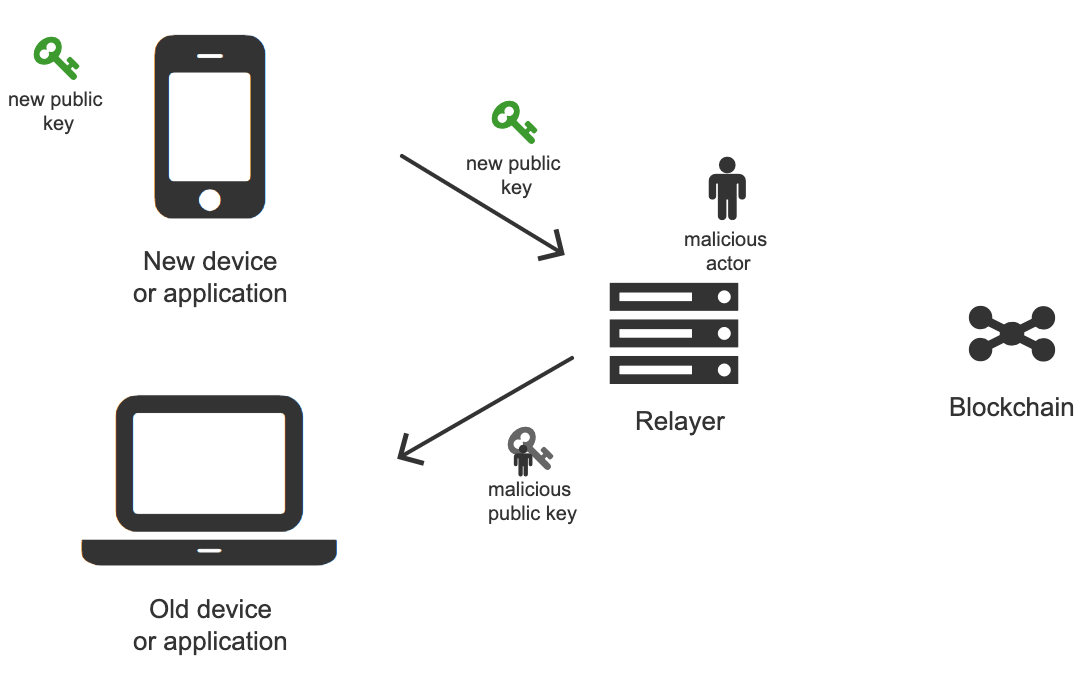
- Man in the middle
A man-in-the-middle attack can happen when the new device sends the new public key to the old device. A malicious actor that intercepts communication (e.g. a relayer) can replace the new public key with a public key that belongs to him and, as a result, take over control of the wallet contract.
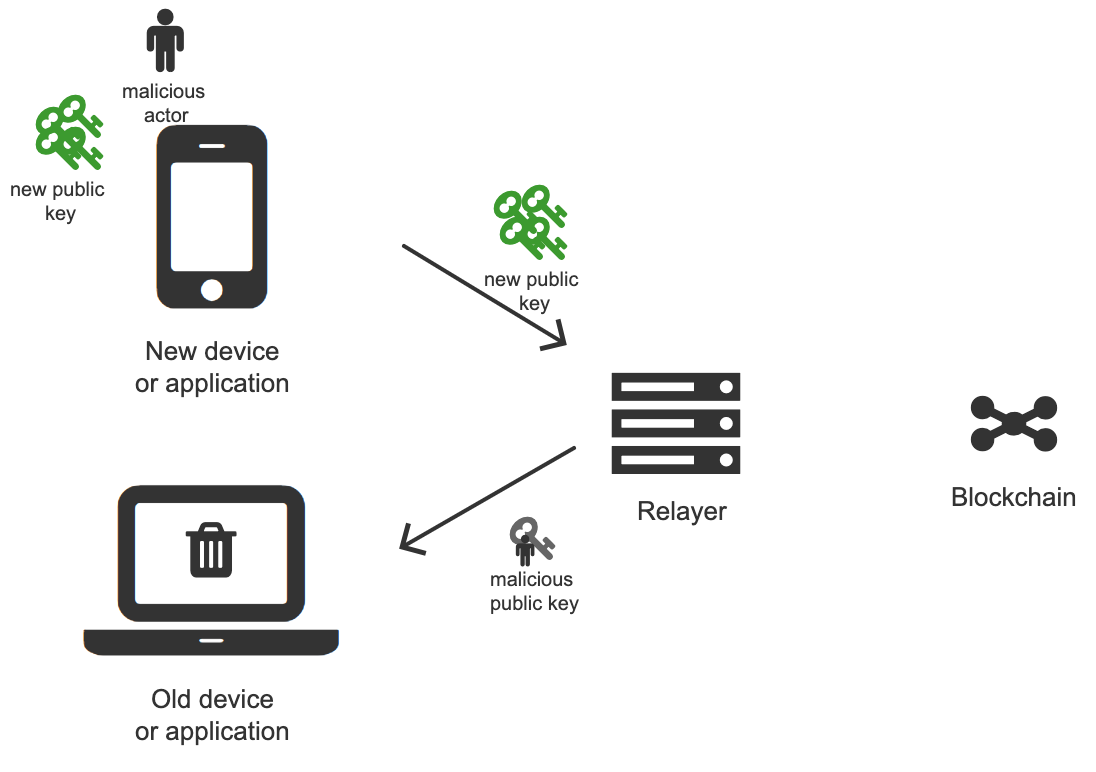
- Spamming
A spam attack can happen when a lot of new devices request to connect to an old device, therefore the old device is spammed with many notifications.
Solution 1
The first solution is pretty straightforward. A new device transfers its public key to the old device.

Transfer means
There are two possible ways of transferring the public key.
Note: This is a public key, so we don’t worry about intercepting.
Note: The seed for the ecliptic curve key that we use has 128 bits or 16 bytes.
Scan the QR code
Manually copy the public key by typing. That might have different shades.
- Retype the letters (32 chars if hex or 26 with just mix cased letters + digits).
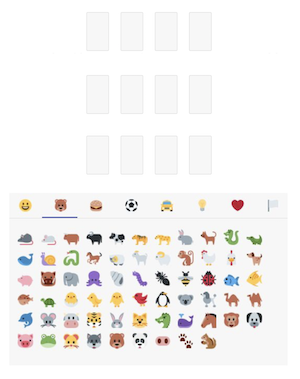
- Use emojis (12 emojis with 1000 emoji base), see the example interface below.
- If both applications are on the some one device -> copy paste. (or in some cases even send by e-mail)
Solution 2
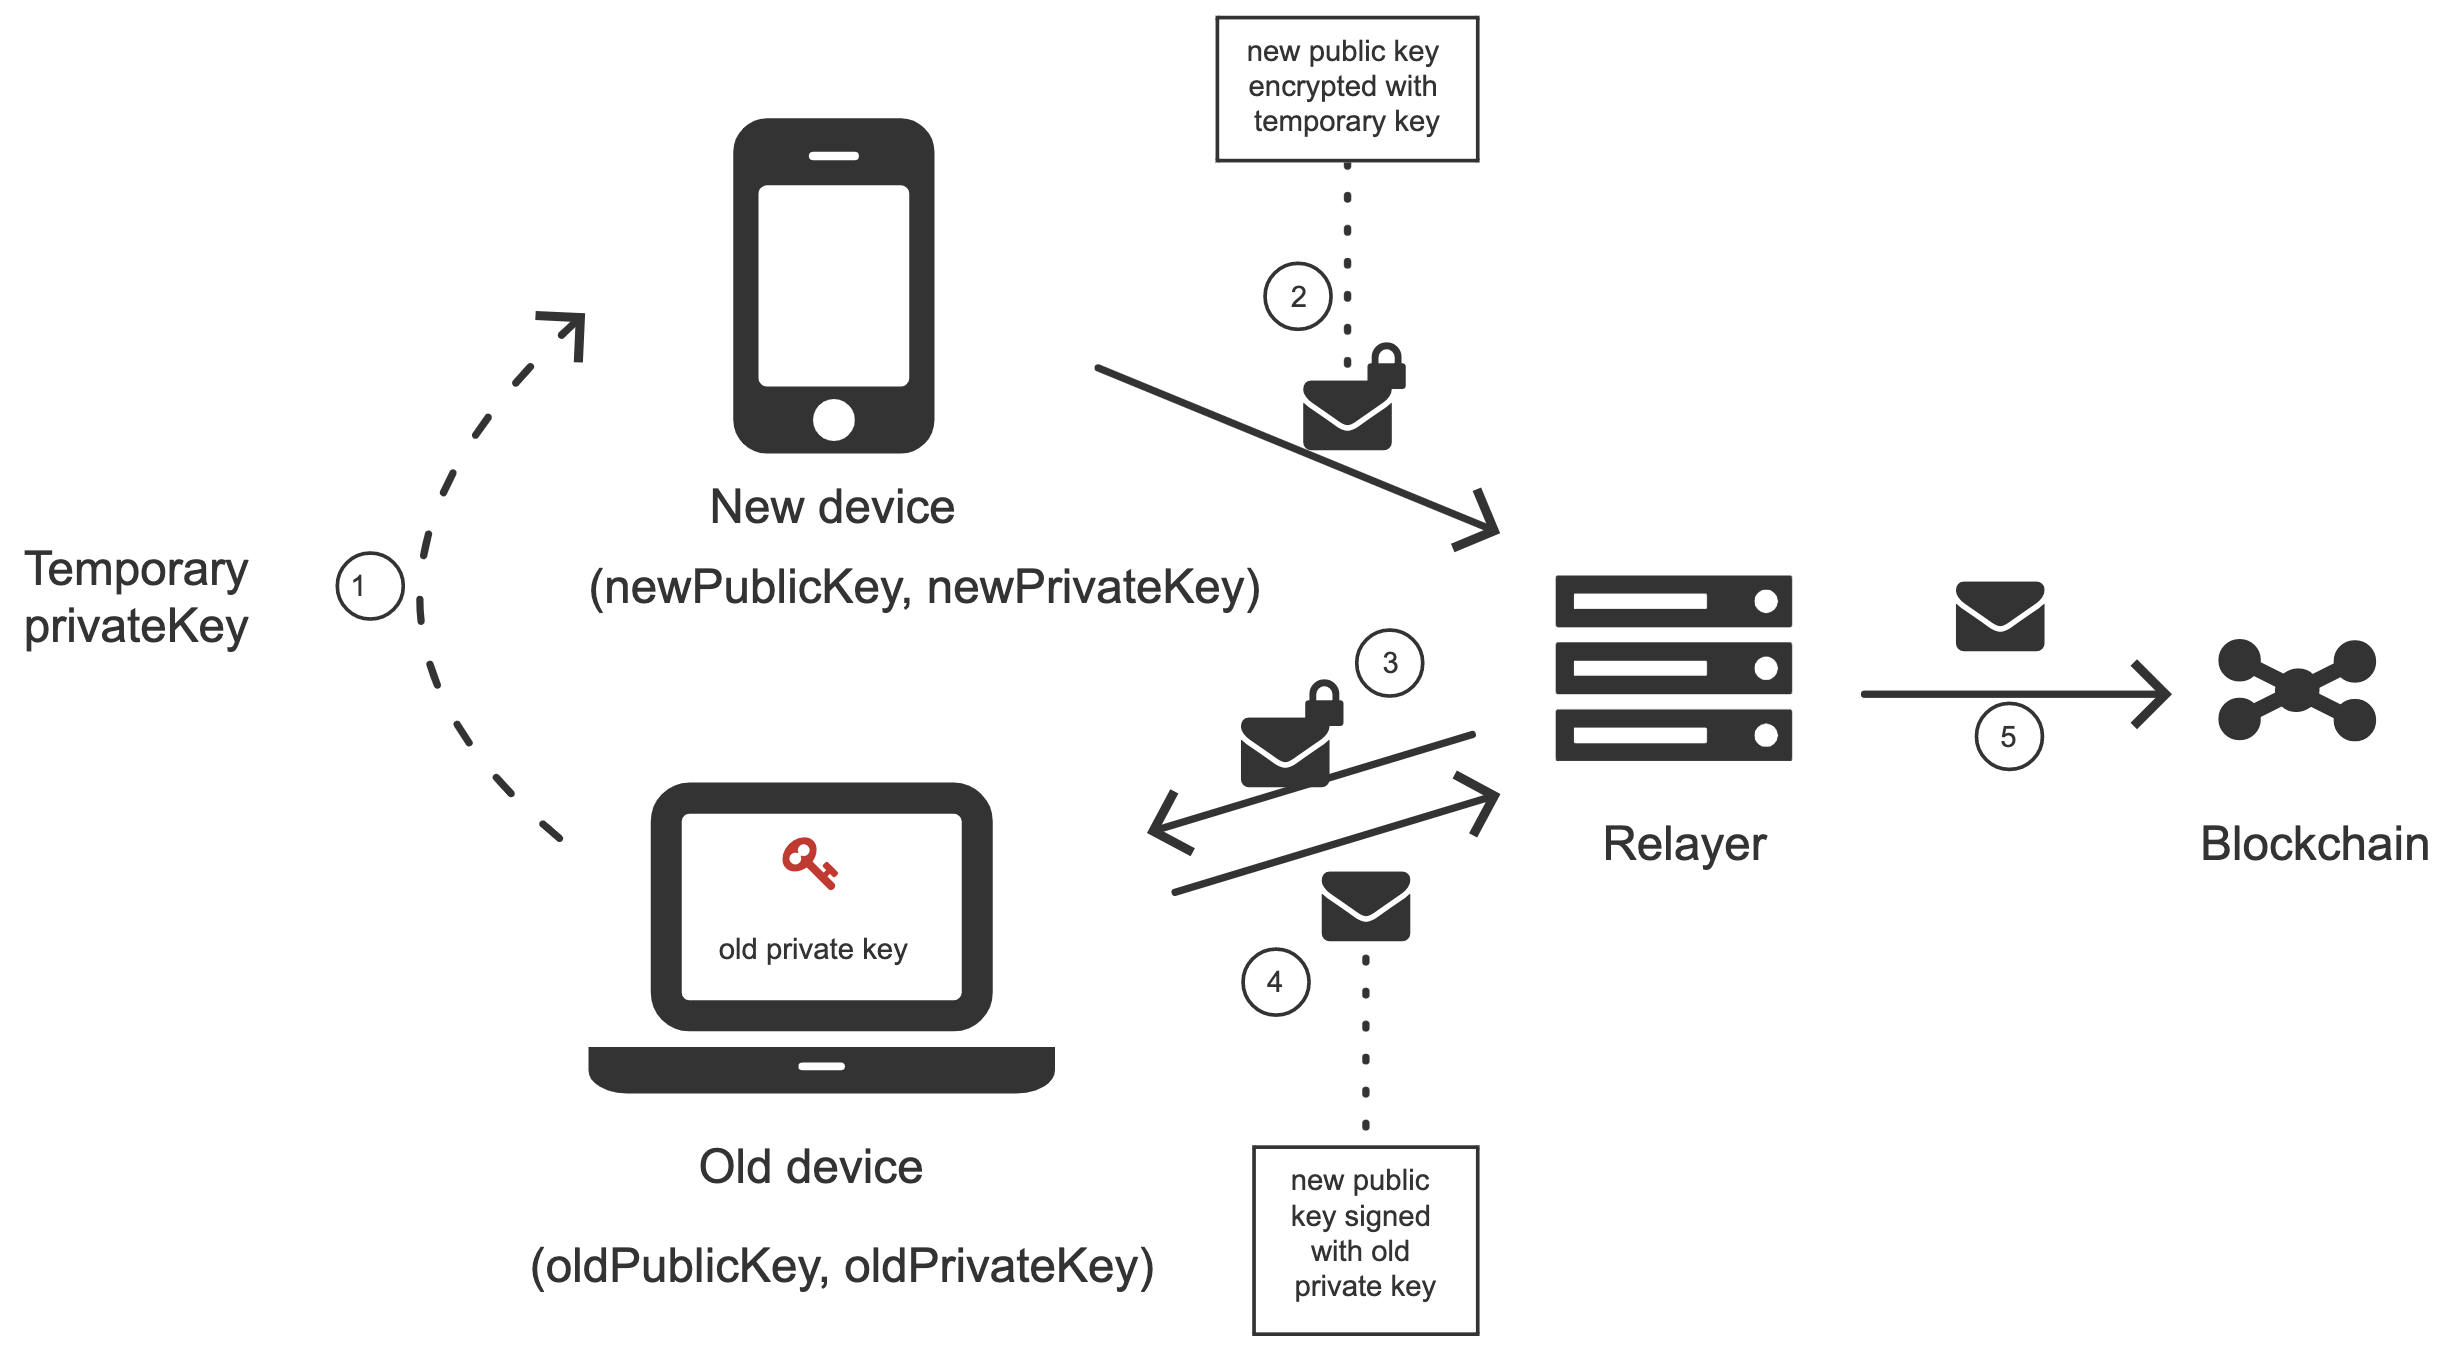
The second solution might be useful if, for some reason, we want to transfer information from an old device to a new device. That might make a difference in the case of using QR codes and the old device does not possess a camera.
The process goes as follows:
- The old device generates a temporary key pair.
- The temporary private key gets transferred to the new device.
- The new device encrypts a new public key using the temporary private key and transfers it to the old device.
- The old device decrypts the new device’s public key and sends a meta-transaction to the relayer adding it to the wallet smart contract.
Solution 3
The third solution is an alternative to the previous solutions. The new device generates a new key pair and shows the user emojis based on a hash of the new public key to the later use on an old device. The newly generated public key is sent to a relayer and forwarded to the old device. To finalize connection of a new device, the user has to arrange emojis on the old device in the same order he has seen on the new device. See below.
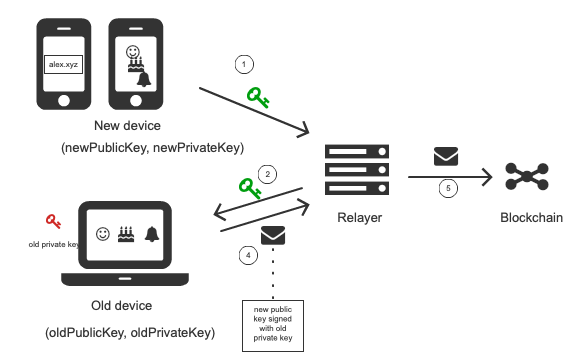
In case of spamming attack in place, the user has to type the emojis manually.
Development environment
Development environment helps quickly develop and test applications using Universal Login.
The script that starts development environment can be run from @unilogin/ops project.
The script does a bunch of helpful things:
- creates a mock blockchain (ganache)
- deploys a mock ENS
- registers three testing ENS domains:
mylogin.eth,universal-id.eth,popularapp.eth - deploys an example ERC20 Token that can be used to pay for transactions
- creates a database for a relayer
- starts a local relayer
Read more in tutorial