Getting started
Overview
Technical concepts
Technically Universal Login utilizes four major concepts:
- Personal multi-sig wallet - a smart contract used to store personal funds. A user gets his wallet created in a barely noticeable manner. The user then gets engaged incrementally to add authorization factors and recovery options.
- Meta-transactions - that gives user ability to interact with the smart contract from multiple devices easily, without a need to store ether on each of those devices. Meta-transactions enable payments for execution with tokens.
- ENS names - naming your wallet with easy-to-remember human-readable name
- Universal login - wallet name can be used to log in to dapps, web, and native applications
Components
Universal Login has three components. All components are stored in one monorepo available here. Components are listed below:
- Contracts - smart contracts used by Universal Login, along with some helper functions
- Relayer - HTTP REST server that relays meta-transactions to Universal Login smart contracts
- SDK - javascript API, a thin communication layer that interacts with the Universal Login ecosystem, via both relayer and Ethereum node.
Additionally, there is one more package in the repository:
- Example - an example app, that demonstrates, used for testing and experimentation.
Dependencies
The diagram below shows dependencies between components.
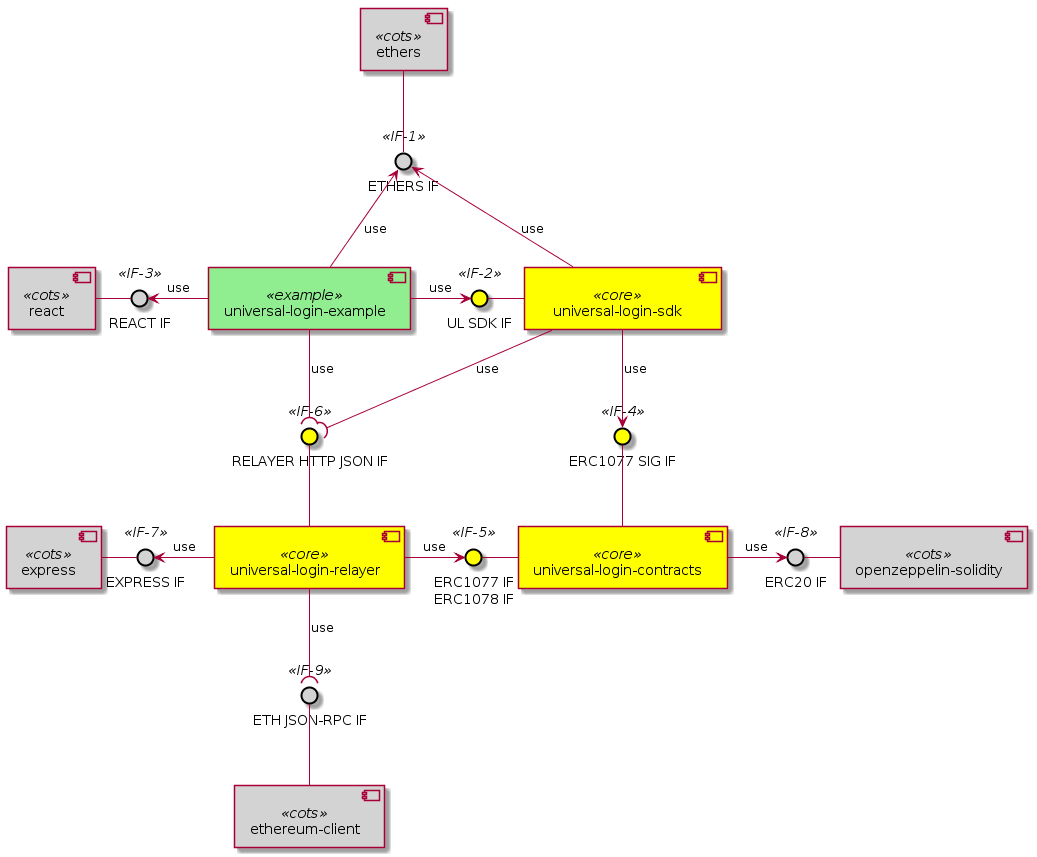
The external interfaces present in the Universal Login system are identified by the lollipop use symbol:
- <<IF-6>> RELAYER HTTP JSON IF
- this interface defines an off-chain remote API for ERC #1077 and #1078
- <<IF-9>> ETH JSON-RPC IF
- this interface is the Ethereum JSON-RPC API for the on-chain execution
The internal interfaces defined within the Universal Login system are identified by the arrow use symbol. The main ones are:
- <<IF-2>> UL SDK IF
- the JS applications using Universal Login shall be based on this library interface to conveniently attach to the Relayer subsystem and route their meta transactions
- <<IF-4>> ERC1077 SIG IF
- this interface is a message hash and signature JS facility API for ERC #1077
- <<IF-5>> ERC1077 IF / ERC1078 IF
- this interface is made up of ERC #1077 and #1078 smart contracts ABI
Quickstart
New project
- Installation
To add SDK to your project using npm type following:
npm i @universal-login/sdk
If you are using yarn than type:
yarn add @universal-login/sdk
Development environment
- Summary
Development environment helps quickly develop and test applications using universal login. The script that starts development environment can be run from
@universal-login/opsproject. The script does a bunch of helpful things:- creates a mock blockchain (ganache)
- deploys mock ENS
- registers three testing ENS domains:
mylogin.eth,universal-id.eth,popularapp.eth - deploys example ERC20 Token that can be used to pay for transactions
- creates a database for a relayer
- starts local relayer
- Prerequisites
- Before running the development environment, make sure you have PostgreSQL installed, up and running. You might want to check database configuration in file knexfile.js and make sure your database is configured correctly.
- Installation
To use development environment, you need to install
@universal-login/opsas dev dependency to your project.With npm:
npm install @universal-login/ops --save-dev
With yarn:
yarn add --dev @universal-login/ops -D
- Adding a script
The simplest way to use development environment is to add a script to
package.jsonfile:... "scripts": { ... "start:dev": "universal-login start:dev" }
- Running development environment
To start development environment type in your console:
yarn start:dev
Which will start the development environment. The output should look somewhat like this:
Wallets:
  0x17ec8597ff92C3F44523bDc65BF0f1bE632917ff - 0x29f3edee0ad3abf8e2699402e0e28cd6492c9be7eaab00d732a791c33552f797
  0x63FC2aD3d021a4D7e64323529a55a9442C444dA0 - 0x5c8b9227cd5065c7e3f6b73826b8b42e198c4497f6688e3085d5ab3a6d520e74
  0xD1D84F0e28D6fedF03c73151f98dF95139700aa7 - 0x50c8b3fc81e908501c8cd0a60911633acaca1a567d1be8e769c5ae7007b34b23
  0xd59ca627Af68D29C547B91066297a7c469a7bF72 - 0x706618637b8ca922f6290ce1ecd4c31247e9ab75cf0530a0ac95c0332173d7c5
  0xc2FCc7Bcf743153C58Efd44E6E723E9819E9A10A - 0xe217d63f0be63e8d127815c7f26531e649204ab9486b134ec1a0ae9b0fee6bcf
  0x2ad611e02E4F7063F515C8f190E5728719937205 - 0x8101cca52cd2a6d8def002ffa2c606f05e109716522ca2440b2cc84e4d49700b
  0x5e8b3a7e6241CeE1f375924985F9c08706f41d34 - 0x837fd366bc7402b65311de9940de0d6c0ba3125629b8509aebbfb057ebeaaa25
  0xFC6F167a5AB77Fe53C4308a44d6893e8F2E54131 - 0xba35c32f7cbda6a6cedeea5f73ff928d1e41557eddfd457123f6426a43adb1e4
  0xDe41151d0762CB537921c99208c916f1cC7dA04D - 0x71f7818582e55456cb575eea3d0ce408dcf4cbbc3d845e86a7936d2f48f74035
  0x121199e18C70ac458958E8eB0BC97c0Ba0A36979 - 0x03c909455dcef4e1e981a21ffb14c1c51214906ce19e8e7541921b758221b5ae

Node url (ganache): http://localhost:18545...
      ENS address: 0x67AC97e1088C332cBc7a7a9bAd8a4f7196D5a1Ce
Registered domains: mylogin.eth, universal-id.eth, popularapp.eth
    Token address: 0x0E2365e86A50377c567E1a62CA473656f0029F1e
      Relayer url: http://localhost:3311
Using SDK
Creating a wallet contract
To start using SDK you will need to create SDK instance and deploy a wallet contract. Below is a snippet doing precisely that for the development environment.
import UniversalLoginSDK from '@universal-login/sdk';

const universalLoginSDK = new UniversalLoginSDK('http://localhost:3311', 'http://localhost:18545');
const [privateKey, contractAddress] = await sdk.create('myname.mylogin.eth');
The first argument of UniversalLoginSDK constructor is relayer address, second is Ethereum node address.
Sending transaction
Once you have contract wallet deployed you can execute a transaction:
const message = {
  from: '0xA193E42526F1FEA8C99AF609dcEabf30C1c29fAA',
  to: '0xbA03ea3517ddcD75e38a65EDEB4dD4ae17D52A1A',
  data: '0x0',
  value: '500000000000000000',
  gasToken: '0x9f2990f93694B496F5EAc5822a45f9c642aaDB73',
  gasPrice: 1000000000,
  gasLimit: 1000000
};

await sdk.execute(message, privateKey);
Note: from field in this case is contract address.
Most fields of a message are analogous to normal Ethereum transaction, except for gasToken,
which allows specifying token in which transaction cost will be refunded.
The token need to be supported by relayer. Wallet needs to have enough token balance to refund transaction.
A detailed explanation of each method can be found in subsections of SDK documentation: creating SDK, creating wallet contract and execute.
Connecting SDK to testnet
To connect SDK to the Rinkeby testnet and the test relayer:
import UniversalLoginSDK from '@universal-login/sdk';
import ethers from 'ethers';


const relayerUrl = 'https://relayer.universallogin.io';
const jsonRpcUrl = 'https://ropsten.infura.io';

const universalLoginSDK = new UniversalLoginSDK(relayerUrl, jsonRpcUrl);
You can find example usage of SDK here
What’s next?
Go to:
- SDK documentation - if you would like to build an application using Universal Login
- Relayer documentation - if you would like to set up your own relayer
- Example documentation - if you would like to play with the example application